


Just set up a new AWS account and looking for a guide on best practices? This is the article for you.
Setting up your first AWS account can be an exciting time. There’s a ton of toys to play with and it can be overwhelming where to start.
But be warned, the path to being proficient in AWS is full of thorns. Leaked credentials, hacked accounts, mis-understandings of “free tier” to name a few are mistakes that many fall victim to. A quick search for the term hacked on the /aws subreddit immediately makes clear that the costs can be high for a single mis-step – no pun intended.
Don’t be one of those people. Don’t be the guy that doesn’t follow some simple steps and ends up in a heart bursting panic attack when they realize their AWS account has been compromised.
The reason I’m writing this article is to help the AWS community clearly define some best practices when initially setting up their AWS account. My goal is for nobody to have surprise bills on their AWS account.
But protecting yourself requires some effort on your part to understand AWS security and billing fundamentals. Once you have a grasp, you can take actions to concretely protect your account. And heaven forbid you do end up getting a surprise bill, I’ll give you some tips to navigate the heart-wrenching episode and hopefully get you off the hook.
So lets go.
Table of Contents
- Checklist Item 1 – Understanding AWS Free Tier
- Checklist Item 2 – Create a User Account and Enable Multi Factor Authentication
- Checklist Item 3 – Setting up the AWS CLI
- Checklist Item 4 – Setup Billing Alert Notifications
- Checklist Item 5 – Enable the Billing Dashboard Widget
- What To Do If You Get A Surprise Bill OR Your Account Gets Hacked
Checklist Item 1 – Understanding AWS Free Tier
One of the most common complaints with AWS billing is a misunderstanding of the Free Tier. Some folks think that their account being under free tier status means they will not be charged for using resources. This is incorrect.
12 Month’s Free – Kind Of?
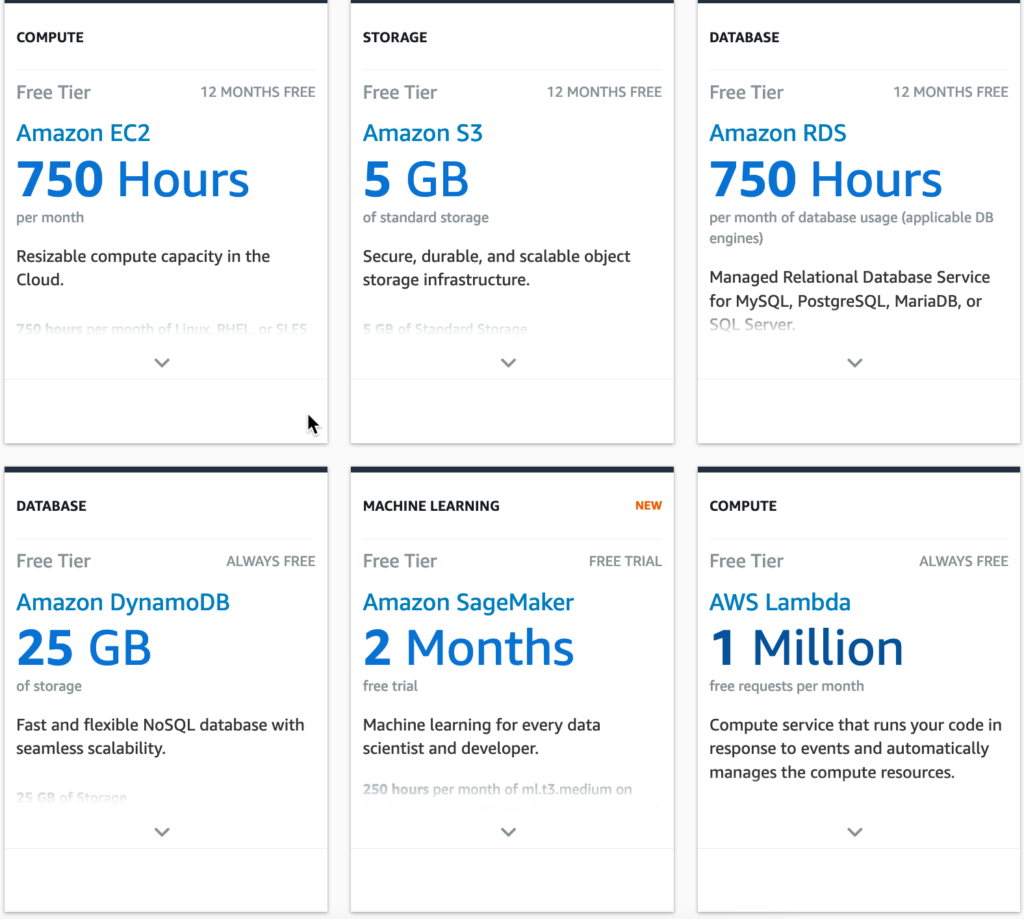
There are three distinctions of the free tier that you need to understand. First, there’s a concept of 12 month’s free. This feature is available to new AWS customers and allows you to test and experiment with a variety of AWS services free of charge.
As an example of what you can get for Free Tier, consider these examples:
- 750 Hours of EC2 per month for a t2 or t3 micro (effectively free per month).
- 5GB of storage for Amazon S3 with plenty of read and write requests.
- 1 million API Gateway requests per month.
There’s many many more other services covered in the free tier that you can experiment with. You can learn more about them at this link.
The free tier’s usage period lasts for 12 months from the date you create your AWS account. Note that you will start getting charged if your resources that are currently covered under free tier are still in use after the 12 months expire. So its important to remember to either a) tear down your resources when you’re done, or b) set a reminder in your calendar to come back in 12 months and delete your account.
WARNING. You might fall into the trap of not understanding is that using a service can sometimes cause other services to be used as well. The linked service may not qualify for free tier which can lead to unexpected bills.
For example, say you were to start using AWS Lambda which qualifies for free tier. When emitting to system output (i.e. using console.log() or print functions), your log files are sent to Cloudwatch. If your log files exceed 5GB (the current threshold for free tier), you will be charged incrementally at a rate of $.50 per GB of log files.
This same pattern applies to other services as well. In the case of RDS, you can assign a 20GB storage volume to your database and still qualify under free tier. But if you increase the storage past 20GB, you’ll start getting charged for additional usage. There is no warning in the AWS console that will tell you this is going to happen (arguably there should be but that’s a topic for a different day). You just need to kind of know.
Next up we have the concept of Free Trials.
Free Trials
Another category of free usage on AWS is the concept of free trials. Free trials allow you to experiment with an AWS service for a set period of time. The trial period starts from the moment you initially activate the service in question.
Some examples of services that qualify for free trials are:
- 3 Months of Amazon Lightsail
- 30 days of Amazon Quicksight
- 2 Months of Amazon Redshift
Note that you can still qualify for a free trial even after your account has passed 12 months of tenure. However, the same rules apply for the free tier. That is, you will start getting charged if you are still using the service after the free trial expires. Tread carefully.
Always Free
To make things more complicated, there is a third category of free usage of AWS services. The Always Free category means that some AWS services offer an amount of usage that is always free no matter how old the account is. Many popular AWS services qualify for Always Free and more often than not, the amount of resources you get for free can cover your use case. This effectively allows you to use some AWS services forever without costing you a dime.
Some examples of service usage that qualifies for Always Free are:
- 1 million Lambda invocations.
- 1 million SNS publishes.
- 1 active CodePipeline.
- 25GB of DynamoDB Storage + 25 RCUs and WCUs
Free Tier Wrap Up
As you can tell, things get a little complicated with Free Tier. You can use this handy tool to apply filters for each of the three categories (12 month free, trial, always free) to see what qualifies for what category.
I have two pieces of advice for you to navigate through this process:
- Be careful of side effects when using a service – launching one service can cause usage in another. If you’re not sure about something and afraid of spending $$$ to find out, read the docs.
- Be careful with seemingly innocent options when launching a service. There are some settings (ehem looking at you RDS Multi-AZ availability) that can cost a fortune if you enable them unknowingly.
Checklist Item 2 – Create a User Account and Enable Multi Factor Authentication
When you first sign up for your AWS account, you are able to sign up using the email and password you originally provided. Signing in with this method is called signing in as the Root User.
The Root User is a very powerful user in the context of an AWS account. It is effectively the top level super user that has access to special security (and other) controls that normal users do not have access to. Some special privileges include things like revoking a normal user’s account and viewing/delegating billing permissions.
This means that if for some reason an employee or sub-user of your AWS account accidentally leaks their credentials on the web, the root user will be capable of revoking access. This is a powerful ability. After you create your user account (which we will discuss below), you should safely store your root account credentials.
Note that you should never use the root user to perform day to day tasks. Instead, you immediately lock down your root user with MFA and create a normal “user” account for your day to day activities.
Enabling MFA simply means that in order for a person to log in to your AWS account, they must validate their login session with a code provided on a secondary device. The most popular (and easiest IMO) way is to use the Google Authenticator app on your cell phone.
After enabling the app, any login on a MFA enabled account will require you to type in a 6 digit rotating code provided on your Google Authenticator (or other MFA device) app. This is great from a security perspective.
If you’re wondering on the exact steps to setup MFA, I created a tutorial on YouTube that walks you through the setup process of enabling MFA for your Root User account below.
Create a User Account
The next thing you’ll want to do is create a normal user account. This is the account that you should use on a day to day basis to interact with AWS. You can still use a user account to log in with a username and password to access the AWS console, or alternatively can use secret keys to access it programmatically.
There are a couple advantages of using this account over the Root User account. For one, User Accounts can (and usually do) have less permissive permission policies. This can protect you from accidentally creating or using a resource you don’t intend to.
The second advantage has to do with reducing the blast radius in case of compromised credentials. Heaven forbid you accidentally leak you secret keys to the public, you can use your Root User to revoke the User Account’s credentials. This will immediately put a stop to the bad actor and allow you to begin the damage assessment and cleanup phase.
You can learn how to create a user account as a root user in my video below.
REMEMBER – You’ll want to activate MFA on your user account as well for the same reasons as doing so on the Root Account. As a general best practice, any human using AWS should be logging in with MFA.
Checklist Item 3 – Setting up the AWS CLI
The AWS CLI is a command line interface that allows you to interact with AWS services through your terminal. Not only that, many other services/integrations require you to have the AWS CLI setup and configured correctly (i.e. using SAM, CDK, Amplify, and others). So its important not to skip this step. This step isn’t related to cost mitigation or security or anything like that, its just an important step for setting up your AWS ecosystem.
Setting up your AWS CLI requires you to get access your your Access Key and Secret Access Key. You should have those handy after creating your user account from the previous step.
After you’ve downloaded and installed the CLI, run the command aws configure to launch the setup wizard. You simply provide your access key, secret access key, and preferred region, and you’re off to the races.
For those of you using Windows, I have a YouTube tutorial on how to set this end to end down below. For those of you on Mac, you can follow the instructions in my article here.
Checklist Item 4 – Setup Billing Alert Notifications
By default, AWS sends you monthly bills based on your usage. One proactive step you can take to ensure you don’t end up with surprises is to enable billing alerts.
Billing alerts allow you to get automatic notifications when the amount spend on your current bill exceeds a dollar value threshold. The threshold you set can be customized to any value you please.
This simple little trick has helped me numerous times avoid unexpected surprises at the end of the month. Sometimes you might create an AWS resource as a test, get pre-occupied with something else, and forget to come back and clean up your work. Depending on the resource you create, this can be a pretty costly mistake if you wait till the end of the month to find out.
Another risk this helps with is getting early warnings if there is a security issue with your account. If a bad actor gets ahold of your credentials and starts spawning up hundreds of EC2 instances to mine Bitcoin, you’ll atleast get early warnings and be able to revoke the access keys pretty quickly.
The exact dollar amount you decide to use for your billing alert depends from person to person. I like to set mine to $25.00 since my usual bills are around $15.00 per month. However if you’re trying to avoid charges altogether, set this to a really low value such as $1.00.
For a walkthrough on how to set up billing alerts in the AWS console, you can follow my guide here or watch my YouTube video below.
Checklist Item 5 – Enable the Billing Dashboard Widget
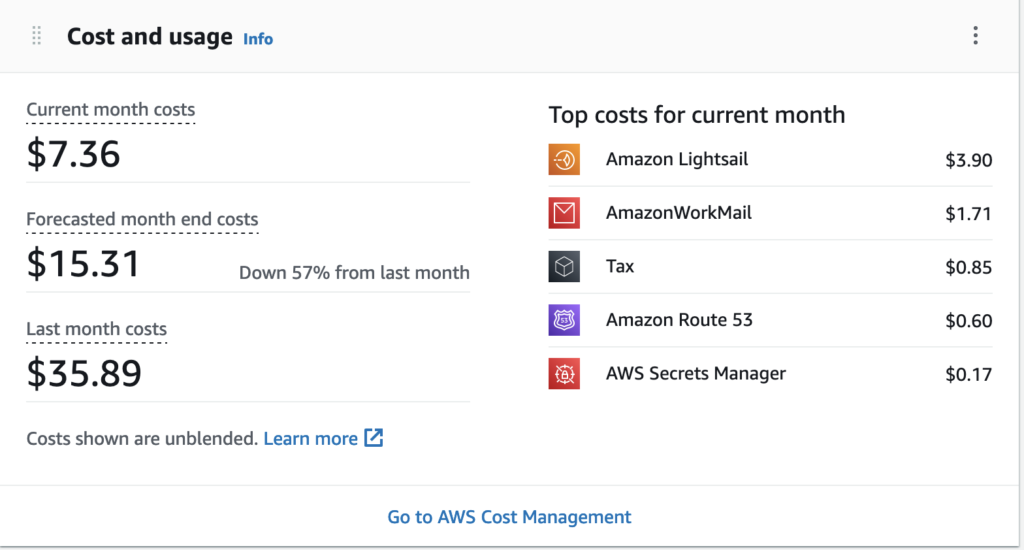
The Billing Dashboard widget is a relatively new AWS feature. It allows you to see quickly see your spending per month directly on the home page of the AWS console.
The widget shows you the top services you’ve spent on so far this month in descending order. This is a really handy feature that has helped remind me on numerous occasions to tear down an unused resource. This tip in conjunction with using billing alerts should effectively safeguard you from any surprise bills.
One thing to note though of this feature is that by default, normal AWS users (except the root user) can not view the billing dashboard widget. It will simply show up as empty.
This is because the root user is the only user that has permission to view billing details unless specific steps have been taken. This involves enabling bill viewing for other users via a specific tucked away setting, and granting users a specific IAM policy permission.
To add the ability for user accounts to view billing information, you can follow my walkthrough article here or watch my YouTube video below.
So far, we’ve gone through 5 important checklist items when setting up your AWS account. Many of these items have been around avoiding a surprise bill and securing your account.
Even for the most experienced, sometimes mistakes are made. I want to shift gears now and give some advice on what to do if heaven forbid your account does get compromised. So let’s get into it.
What To Do If You Get A Surprise Bill OR Your Account Gets Hacked
Waking up to a multi thousand dollar AWS bill is a gut-wrenching moment. Anxiety, fear, anger jolt through your veins as you try to assess the damage and stop the madness from worsening. Here’s how to handle it.

First, stay calm and relax. If you’ve followed all of the steps from this checklist, it is very likely that AWS will forgive your bill regardless of the cost. This is because you took all reasonable pro-active steps to protect your account. This is especially true if this is the first time an issue like this has occurred on your account. AWS employees aren’t monsters – they understand that people make mistakes.
Deactivating Users
It’s more than likely your account was “hacked” because someone re-used a password, or accidentally leaked their access keys. This is an easy problem to fix – you simply need to disable the affected accounts.
To start getting the situation under control, you need to start revoking IAM user permissions in the AWS console. This will prevent users from creating resources in the console, or programmatically using their access keys. You will be able to do this as the root user which has an elevated permission set. Simply log in to the console as your root user, and deactivate all user accounts.
Identifying which account to de-activate can be a bit tricky though. In a situation like this, I suggest shooting first and asking questions later – just deactivate them all and figure it out later. Later on you can use CloudTrail to identify which user account was responsible for creating the resources.
Clean Up The Mess
Your next priority should be to clean up all the resources that the bad actor created. This can be from any AWS service – but by far the most commonly used one for hackers is EC2 since its such a versatile service.
What you can do to narrow down what they created quickly is to head over to the Billing Dashboard section of the AWS console. Here, the dashboard will show you a summary of all AWS services that are being used in the account.
You’ll need to identify the services the individual created resources in and go and delete/remove them. Also remember to do this for all AWS regions to ensure you got everything.
Contact AWS Support
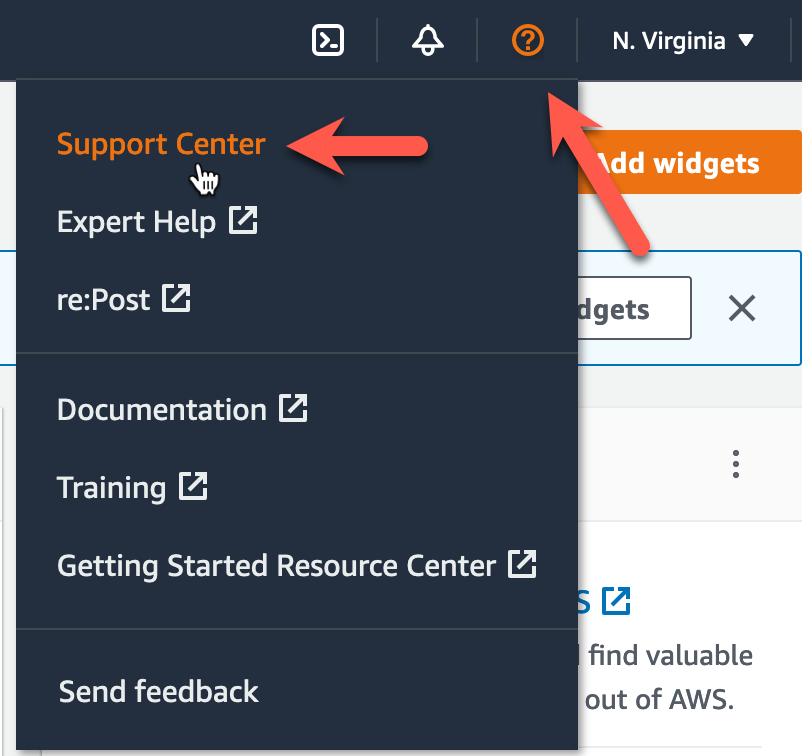
After you’ve mitigated the attack, its time to get AWS involved. Do note that if you get stuck in any of the prior steps and don’t know how to proceed – just contact AWS and they will give you advice. The best way to contact AWS is through the Support section of the AWS console. You can file a ticket with them and request either Web or Phone support. Web opens up a live chat box that should get you on the horn with an AWS employee pretty quickly. Phone support means to expect a callback. I’d go with web.
If you’re following this sequence, you’ll now need to contact AWS and beg for forgiveness. Let them know that you received a surprise bill and the steps that you went through to mitigate the attack. Tell them that you had billing alerts enabled, used the billing dashboard widget, and made efforts to safely store your access keys.
More often than not, AWS will offer to forgive your bill – especially if this is your first offence. If not, you can reach out to the infamous Corey Quinn and see if he can work his magic.


