


Trying to figure out how to trigger an event (Lambda, SQS, SNS, etc) at a specific time in AWS? Learn how using the easy to use (and newly announced in 2022) EventBridge Scheduler.
Are you trying to trigger an event at a certain timestamp? For example, at precisely 3:55PM on November 12th?
Previously, developers needed to use round-about and overly complex solutions like AWS Step Functions Wait Tasks to accomplish this. Even worse, some folks developed their own custom solution using normal Eventbridge Rules + Lambda + DynamoDB – Yuck.
For a long time now, I’ve been asking AWS for a simple service that will trigger a one-off event at a specific time. This is useful in SO many applications its kind of crazy AWS hasn’t offered this ability – until now.
AWS has finally listened and released EventBridge Scheduler. This serverless tool allows you to do just that – register an event that can be triggered at a moment that YOU specify at some point in the future.
In this article, I’ll show you how to set up EventBridge scheduler with their one-time event type. So let’s get into it.
Important EventBridge Scheduler Concepts
Before we get started with the tutorial, I wanted to provide a brief explanation of the core EventBridge Scheduler concepts. Although we’ll be using the one-time schedule type in this tutorial, its important to know the other two types of schedules and how this product differs from EventBridge Rules.
The Different Type of Schedules
A schedule is a core concept in AWS EventBridge. There are three types of schedules you can create – one-time, rate, and cron.
One-time is self explanatory – it is a schedule once, fire and forget type of event.
Rate allows you to set a specific interval to trigger your event – for example, every minute, 5 minutes, day, hour, so on and so forth.
Cron is an extension of rate except that it allows you to create more flexible schedules that trigger at custom intervals – for example, every wednesday at midnight in the year 2022.
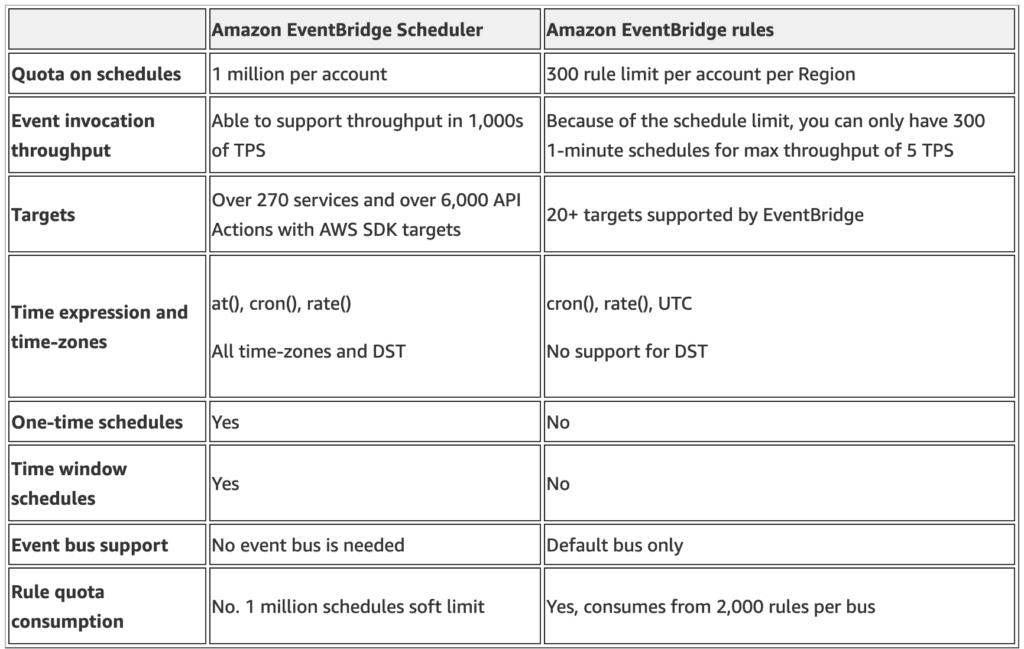
Those of you familiar with EventBridge may be thinking – wait a minute, those last 2 sound an awful lot like normal Eventbridge Rules. Good observation. The key difference between an Eventbridge Scheduler rate/cron and a Eventbridge Rule rate/cron is that the scheduler variation allows you to specify a start time and a stop time.
For example, we can create a rate schedule that triggers every hour, but starts on November 12th at 1pm, and ends on December 31st at midnight. This ability is not possible using normal Eventbridge Rules.
You can see a more detailed comparison of Eventbridge Scheduler and Eventbridge Rules in this chart provided by AWS.
For more details on the different types of events and how they work, check out the AWS documentation here.
Schedule Groups
Note that you also have the ability to create Schedule Groups. Schedule Groups are an easy way to group together Schedules that apply to the same application or theme. Since we can now create potentially one-off events, its useful to organize them together into a logical group.
By default, a schedule group will be created for you so you don’t need to worry about this. But for any production use case, you’ll want to create a group and refer to it when creating schedules.
Creating our EventBridge One Time Schedule
Now that we have a basic understanding of what we’re dealing with, we can get started creating our one-time schedule.
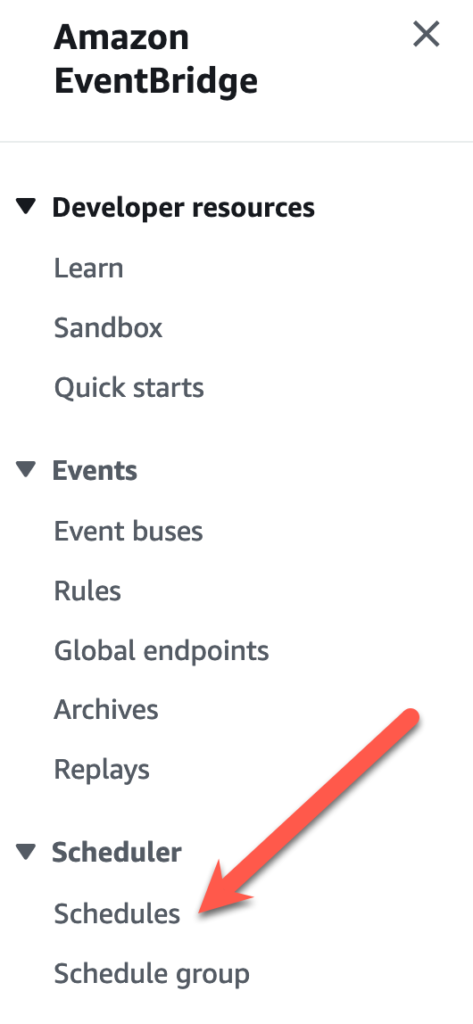
To get started, head over to the EventBridge section of the AWS Console. You’ll notice that there is a new section called Scheduler that you can see below. To create our event, click on the Schedules tab.
After clicking Schedules, click on the orange text box with Create Schedule. This will launch the creation wizard as seen below.
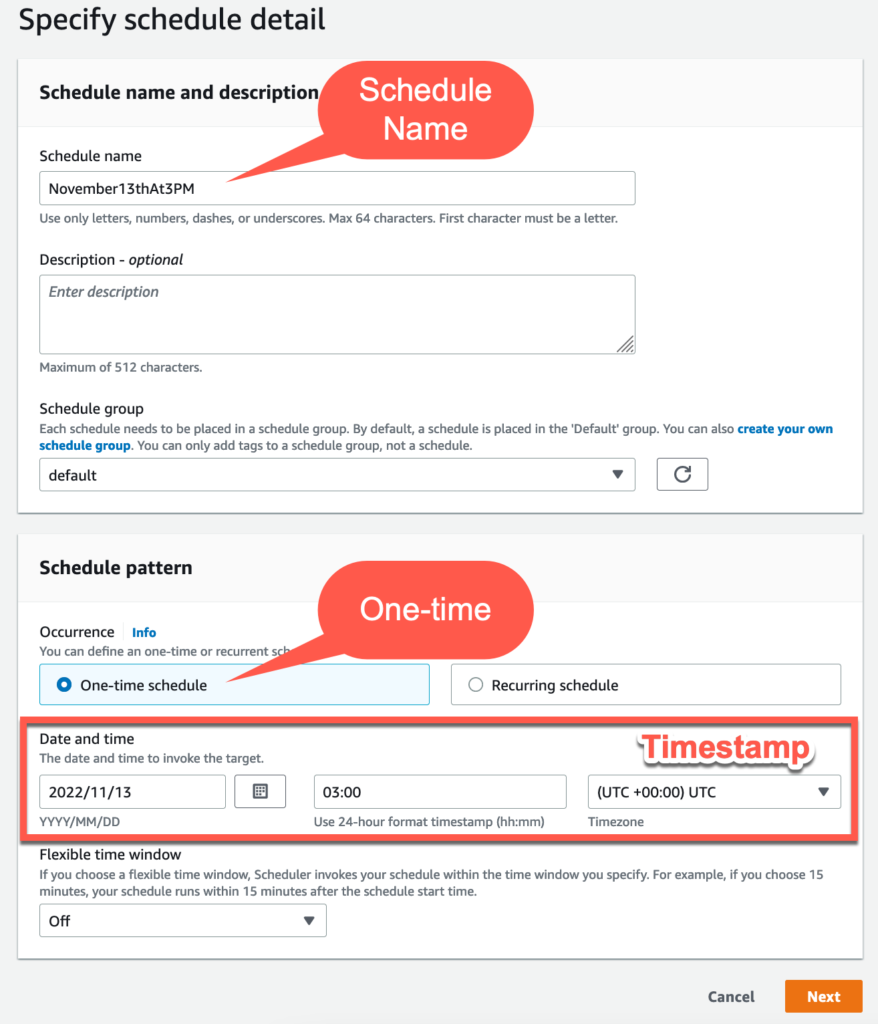
Lets understand a bit more about the settings we have available.
Schedule name is self explanatory – this can be anything you wish.
For Schedule Pattern, we want One-time schedule. This will create an instance of a single event that will fire at a pre-defined time that we choose. You can optionally select Recurring Schedule if you’d like to use the Rate or Cron types we touched on in the previous section.
For Date and Time, select the timestamp you want this event to fire. You can also select the timezone of the event. This defaults to your local timezone but I suggest to use UTC +0 for consistency.
Note that the One-time events have a minimum granularity of one minute. That means that you cannot specify the specific second (or anything more specific than that) with a one-time event. This kind of sucks but I understand why AWS does it – second level granularity would be a technical challenge. For most of you however, this limitation shouldn’t be a big deal.
Note that we also have the ability to specify a Flexible time window. As the description says, this feature allows you to vary when the event fires by using a window. This is not useful in my opinion since the whole point of using one-time events is to fire at a specific time! However, this feature can be useful for rate or cron based schedules. I’ll leave it at that.
To proceed, click next in the bottom right.
Selecting a Target
Next, we need to select a target to invoke when our one-time event fires. As you can see in the screenshot below, there are a lot of options.
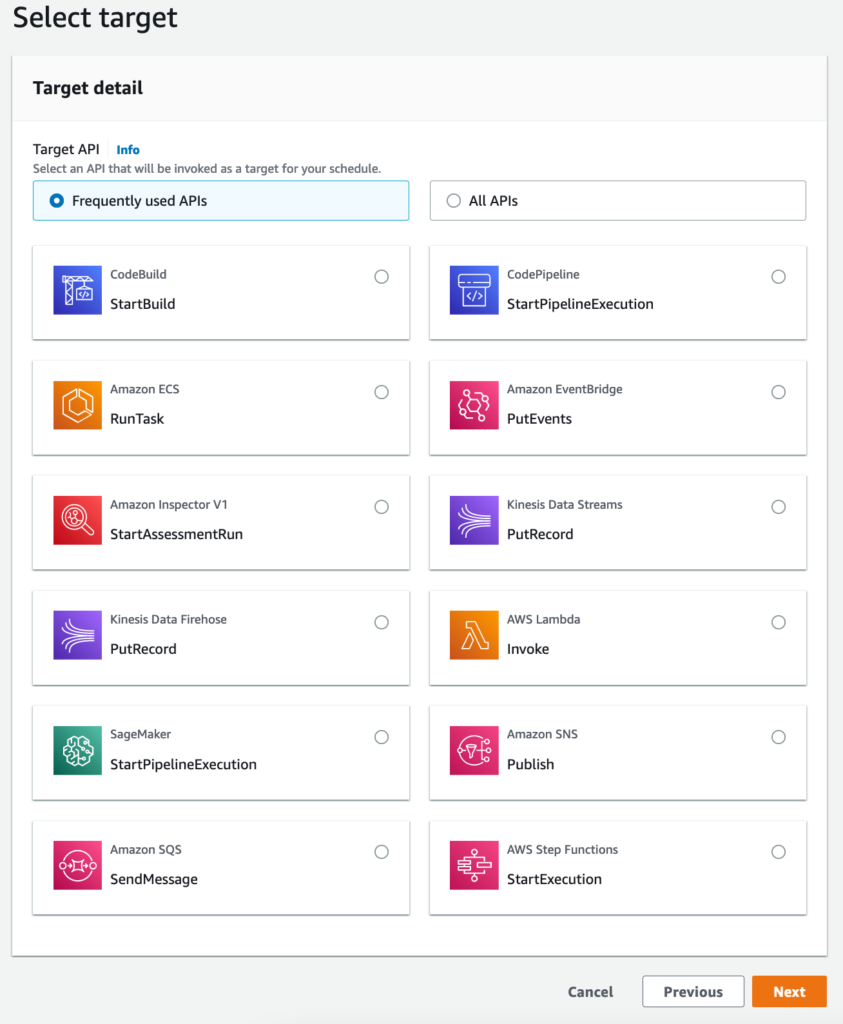
The most common ones you’ll probably be using at probably Lambda:Invoke, SNS:Publish, and SQS:SendMessage. You can also click on the All APIs radio box to access all APIs across AWS services – neat!
In this tutorial, I’ll show you how to set this up using a SQS queue – only because it allows us to easily see the event payload once the event fires. But if you’re following this tutorial and intend to use AWS Lambda, SNS, or something else, the process is almost exactly the same.
In my case, I’m going to select Amazon SQS SendMessage. A dialogue box pops up asking for us to specify the queue we would like to use. I specify an existing queue in my account and provide a payload.
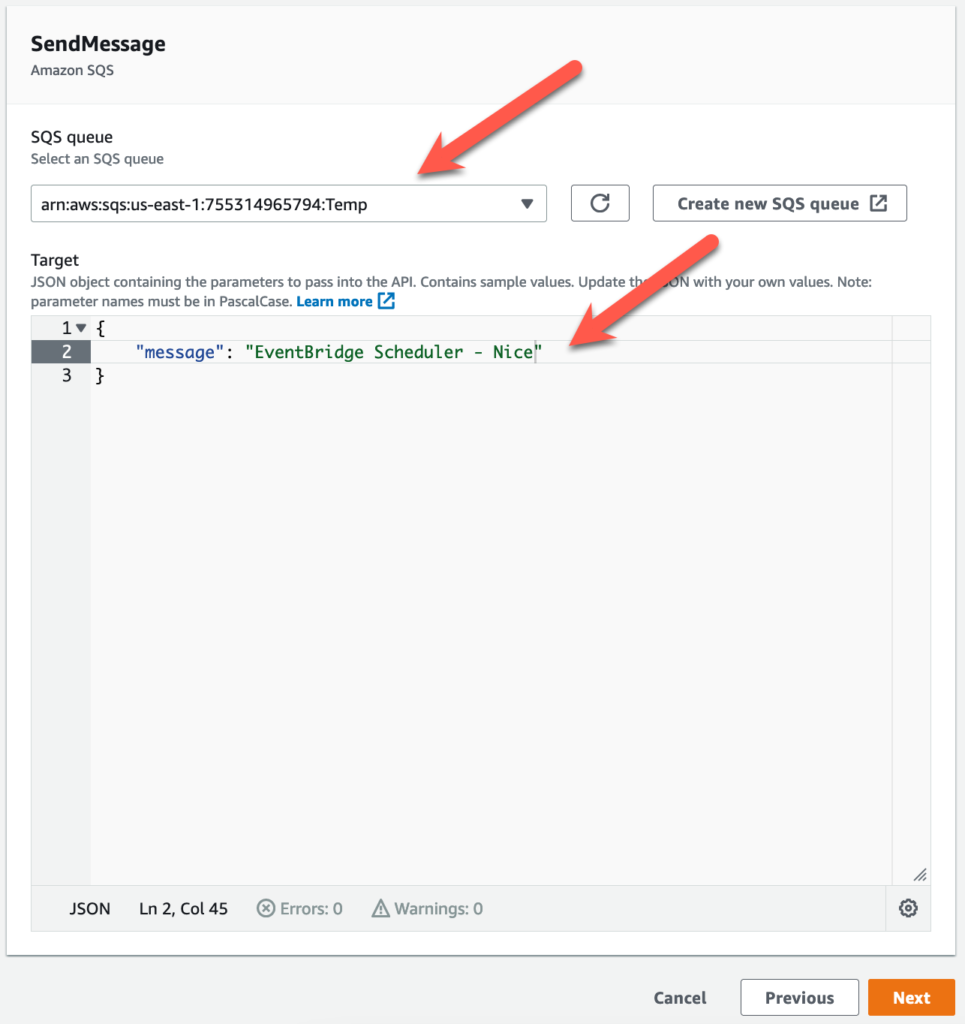
Note that if you use a different integration type such as Lambda or SNS, you’ll need to provide the function name or SNS topic name respectively.
One cool thing I wanted to note is that the payload that you provide can be dynamic. In other words, when we create our event, we can specify a specific payload that will be contained within the message when it fires.
This is really useful in a whole lot of cases. For example, if you’re using this feature to say send a reminder email to a customer 5 days after they place an order, you can provide the customer id and the order id in the event payload when you create the event. That way, when the event fires, you’ll know what customer and order the event is with respect to.
If you don’t specify the payload smartly, you’ll have a bunch of random events triggering and be unable to discern the context for it firing. Use this feature wisely.
Click on next to proceed to the Settings step.
Specifying Retry Policy and DLQ in the Settings
On the next page, we can select from a bunch of available settings as you can see below.
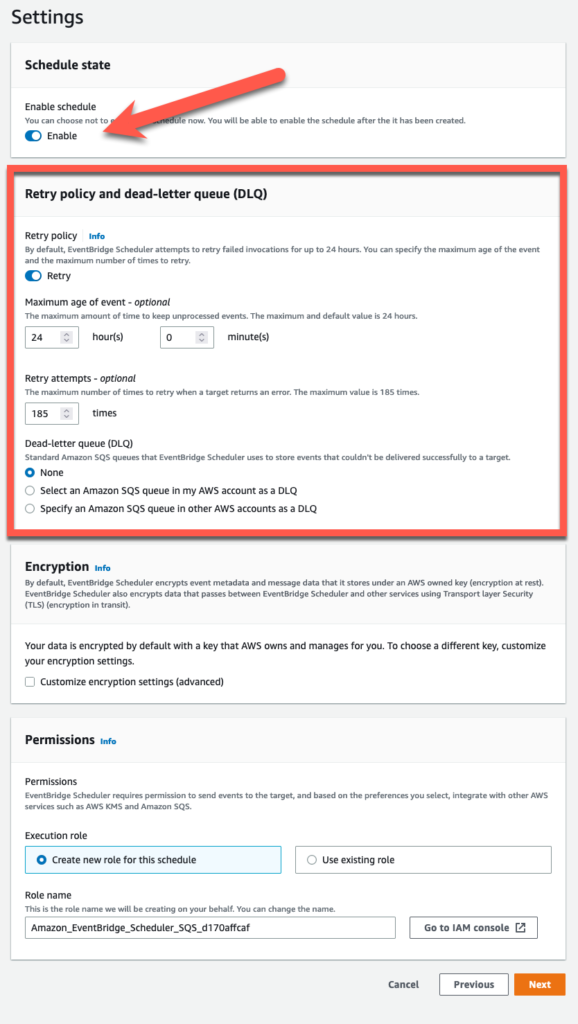
Firstly, we can decide whether or not to enable this schedule immediately or not by clicking the radio button at the top (I suggest enabling).
Another interesting capability is specifying a Retry Policy and a DLQ or Dead Letter Queue.
Retry Policies allow us to tell scheduler to retry delivery of our event over a specific time interval and for a maximum number of attempts. This defaults to 24 hours and 185 attempts (185? really?).
Retry policies are useful when the target we are integrating with is subject to some level of unavailability. For example if I were using AWS Lambda as my target, it’s possible that the Lambda can be at maximum concurrency when my one-time event fires. This will result in a throttle event, and if we DIDN’T have a retry policy, that message could be lost.
With SQS as an integration, this isn’t really an issue. But its always a good idea to use a retry policy for additional resiliency.
You can also specify a DLQ which will be used to temporarily store the message in case it cannot be delivered. This is great to prevent total message loss in the Lambda throttle case I described above.
I’m going to leave these settings as default in our case.
Two other options to pick are related to encryption and Permissions. For encryption, you can select this if you’d like to provide more advanced settings like your own KMS key. But I’ll leave this as default for now.
Permissions are a role that will be used to invoke your target. By default, EventBridge Scheduler will automatically create a role that has the right level of permissions. However if you’re using one-time events at high throughput and doing this programmatically, you’ll want to use the same role for every event instance.
Go ahead and click on next to review our settings and create the one-time event.
Confirming Event Status and Delivery
After creating your event, click the Schedule tab on the left-hand menu. You should now see your event present as a line-item like below.
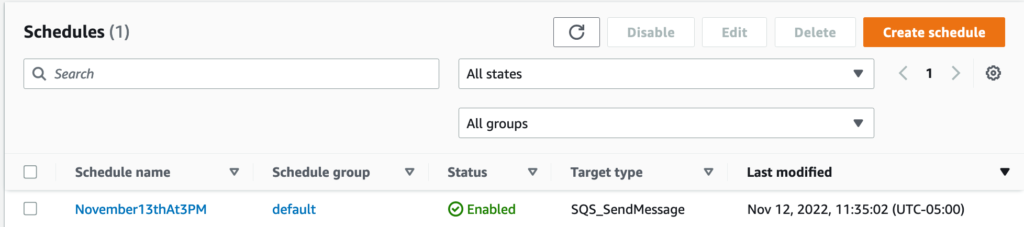
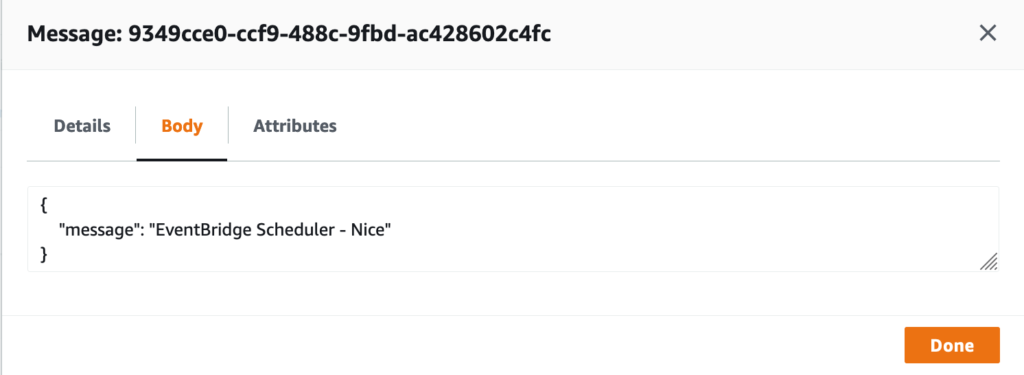
Looks like everything is working. Since the timestamp has already passed, I can go into my SQS queue to see the message has been delivered.
And there it is – the message has been delivered and is ready for our application to pick up.
Wrap Up
EventBridge Scheduler is an incredible new feature that is on the top of my list to explore in 2022 and beyond. The number of time’s I’ve personally needed a serverless scheduling function is laughable, and I’m glad AWS finally decided to offer a tool that solves this specific purpose.
The fact that you also get 14 million events for free with EventBridge Scheduler is pretty amazing. No cost complaints here!
If you enjoyed this article, check out some of my other AWS ones here:


