


1. Overview
This tutorial will show you how to set up an AWS Lambda Event Filter when using SQS as an event source.
2. Starting State
An assumption of this tutorial is that you already have a Lambda function with an SQS queue as an event source. If you don’t already have this set up, you can watch my video tutorial here to guide you through the process.
As a quick reminder, you’ll also need to have the correct SQS permissions attached to your Lambda Function’s role. Here is the policy template that has SQS permissions that is associated with my Lambda function’s role:
{
    "Version": "2012-10-17",
    "Statement": [
        {
            "Effect": "Allow",
            "Action": [
                "sqs:DeleteMessage",
                "sqs:GetQueueAttributes",
                "sqs:ReceiveMessage"
            ],
            "Resource": "arn:aws:sqs:*"
        }
    ]
}
3. Message Content to Filter
Our incoming events will contain the following payload in the body of the message:
{"orderType": "PURCHASE","orderId": "OID-255741","amount": 50.26,"customerId": "CID-921326","destinationAddress": "123 Fake St, Seattle, WA, 12345"}Notice that my orderType field is currently set to PURCHASE. In this example, we want to filter on the orderType field so that my Lambda will ONLY be invoked when the incoming message is of type PURCHASE.
In a real life application, its very common for an event source to contain a variety of different types. For example, its certainly plausible that the source of these events also emits orderType: REFUND events.
Using the event filter methodoly, our lambda function will automatically drop messages that don’t conform to the filter rule. In this case, having the orderType of PURCHASE.
3.1 SQS Wrapper Object
One thing to be aware of is that when connecting an SQS queue with a Lambda function, the incoming events will not contain just the body of the message as seen above. Instead, it will be wrapped in a special nested structure that contains more attributes regarding the message context.
For example, here is what the full message including the wrapper will look like for the same message we looked at earlier:
{
   "Records":[
      {
         "messageId":"61706de2-4d76-49c8-ba02-9baf52581455",
         "receiptHandle":"AQEBWBa6AgAwHZdaCtwkaeFX0V2WFWUEybpxTAlmw4uYr5w1kUHRJu2LhzaxpkSFtqlVYU4/YacSezvX+EUx8mSV7dUAxnpaPdxMLiRqPMwWExjEJC71xTaL2FyF+R1SwkeFK/d6IXygYfIE5fjYF5OL4rv2LBBtcABZEakGl4C5Aq5e0aOtBiAPxte4Euii9IanYb6jo/L0hb/FF7XhX9PnEB7qzqa/8fSDr8QIKLGMlfG4luva4JyZKipieAxOp87lK3Ymm9XP358hBfY2QF0hGhuIopMWdYkyVnJQMcI74jlS1kw31XG04GDpz1rWAsysUnAI10fEniyQYcesD/qF9eeHS+mG53q7tH7vcK3O2ddx3oQwKXM6DAUR6KKvWJkw",
         "body":"{\"orderType\": \"PURCHASE\",\"orderId\": \"OID-255741\",\"amount\": 50.26,\"customerId\": \"CID-921326\",\"destinationAddress\": \"123 Fake St, Seattle, WA, 12345\"}\n",
         "attributes":{
            "ApproximateReceiveCount":"1",
            "SentTimestamp":"1638731244799",
            "SenderId":"AIDA27XCHXURLYZDGRXJ5",
            "ApproximateFirstReceiveTimestamp":"1638731244805"
         },
         "messageAttributes":{

         },
         "md5OfBody":"889a573d8f6cfbeeea55a50506c71d83",
         "eventSource":"aws:sqs",
         "eventSourceARN":"arn:aws:sqs:us-east-1:755314965794:Orders",
         "awsRegion":"us-east-1"
      }
   ]
}
Notice that our actual message content that we are interested in filtering on is nested within the Records arraylist, and behind the body key.
The reason this is important is because when we set up our Lambda Event rule, we need to also include some of the SQS wrapper object’s JSON path to correctly map our objectType field. This will become clear when we create the event filter rule, which is our next step.
4. Filter Rule
The first step is to Create a Filter Rule that is associated with our Lambda’s SQS event source. This can be done through the Lambda console (as seen below) or programmatically using Infrastructure as Code solutions such as CDK or CloudFormation.
You may enjoy this article on AWS CloudFormation Tutorial: Concepts, Workflows, and a Hands on Walkthrough
4.1 Creating the Filter Rule
To create a Filter Rule for our SQS event source, we want to head over to the Configuration tab our your Lambda function and click on the Triggers tab as seen below.

Note: If you have already added your SQS queue as a Trigger for your function you will need to remove the trigger, and re-add it. Currently, there is no way to modify a Filter Rule for a trigger if the trigger has already been created.
Click on the Add Trigger button in the top right to launch the trigger creation wizard.
Since we’re using SQS as our event source for this exercise, we’ll select it when prompted to Select a Trigger.
Next, you need to select your SQS queue. If you’ve already created your Queue you can go ahead and select it now. If not, you’ll need to head over to the SQS section of the console and create one first.
Next, click on the Additional Settings sub-menu. This will enable the set of options we need to update to correctly set up our event filter rule.
In the Filter Criteria section, enter the below Filter Rule:
{"body":"orderType":["PURCHASE"]]}Make sure to not include any extra spaces or hidden characters such as tab character or carriage returns. This will cause your Lambda function to not correctly process the rule and result in a frustrating process to debug the issue.
Note that this is a very simple event rule that matches on text from the orderType field. However, there are much more sophisticated rules that you can specify that filter on numeric values. You can also write Filter Rules that include AND / OR statements allowing you to chain different rules together for some very complex filters. You can read more about these more complex rules in the aws documentation.
You can leave all other options as default and click the Add button in the bottom right.
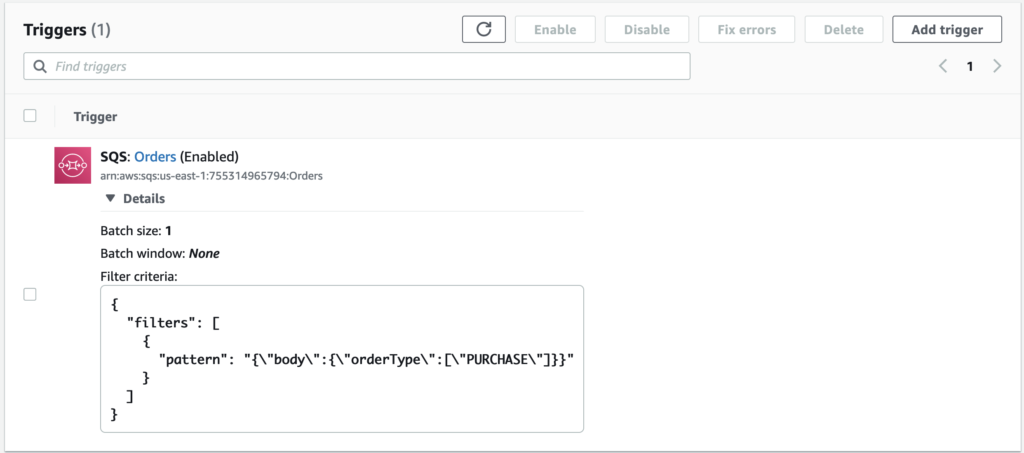
After a couple moments, you’ll see your new SQS Trigger and Filter Rule in the Triggers section of the Lambda console. Notice that Lambda wraps your filter rule into an object and inserts it as a list, as seen below.
5. Conclusion
Your event filter for your lambda function should now be set up correctly. You can verify its working correctly be publishing a message to your SQS queue with both PURCHASE and REFUND orderTypes and observing that only the PURCHASE is being processed.
The filter rule used in this demo was a very simple one, but should give you a basic template to work off of to add more complicated filter rules.


