


Learn how to retrieve a S3 presigned URL, and use it in a POST request to upload to Amazon S3.
Using S3 presigned URLs, you can get your users to directly upload their content to S3 instead of using your backend server as a passthrough.
Using this method, you can reduce load on your own backend, while also providing a more optimal end experience for your users. Further, your client doesn’t need to have any special IAM permissions to perform the upload – its just through a normal HTTP POST request!
In this blog post, I’m going to show you how to generate a presigned URL and uploading to it directly to S3 with Python. Though this is in python, the concepts are the same in any language you use.
Prefer a video format? Check out my YouTube video on this article below.
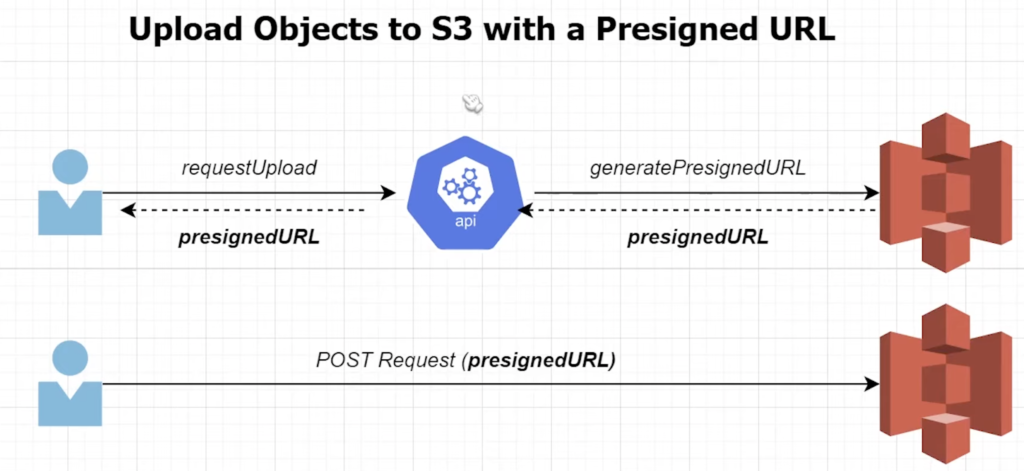
A potential architecture taking advantage of presigned URLs. Users request a presigned URL from your backend API. They then continue to directly upload to S3, bypassing your backend for the content upload portion of the transaction.
Pre-Requisites
- You need an S3 bucket. In this demo, I’m going to be using mine called
beabetterdev-presigned-demo. - An image file or any other file you want to test out the S3 signed url upload with.
- An IAM User and access key + secret access key with S3 permissions.
You may enjoy this article on IAM Fundamentals.
Note: Source code used in this demo is available on github here. Remember to change your file name and access key / secret access key first.
Step 1 – Generate the Presigned URL
First, we need to generate the presigned URL to prepare the upload. We can do this in python using the boto3 library to request a url from Amazon S3 using the boto3 SDK.
The code to to this is as follows:
import constants
import boto3
import requests

OBJECT_NAME_TO_UPLOAD = 'file_to_upload.jpg'

s3_client = boto3.client(
    's3',
    aws_access_key_id=constants.access_key,
    aws_secret_access_key=constants.secret_access_key
)

#Generate the presigned URL
response = s3_client.generate_presigned_post(
    Bucket = 'beabetterdev-presigned-demo',
    Key = OBJECT_NAME_TO_UPLOAD,
    ExpiresIn = 10
)
Make sure to replace the filename with whatever you want to upload. Notice here that I’m using the generate_presigned_post function on the boto3 S3 client to generate the URL. The response contains a presigned URL that we’re going to use as our image upload target in the next step.
Step 2 – Upload to S3 with a POST Request
The next step is to upload our image to the URL received from step 1. We parse out the field from the response and use it as our destination in our HTTP request using the requests library in python.
#Upload file to S3 using presigned URL
files = { 'file': open(OBJECT_NAME_TO_UPLOAD, 'rb')}
r = requests.post(response['url'], data=response['fields'], files=files)
print(r.status_code)
Printing the HTTP status code and receiving a 200 is an indicator of success. Now, go check out your S3 bucket – your uploaded file should be there!


Hi Daniel,
Is it possible to send Presigned URL into Mail body,
When user click the URL, file need to upload into S3 bucket.
Please let me know, if i have sample code is much appreciate
Thank you!