


In this blog post, I’m going to show you how to create multiple AWS accounts using AWS Organizations. If you prefer a visual guide, check out my YouTube video on this topic.
I still remember the first time I learned about ‘per-account’ limits on AWS. It was 2018, right after I launched a new production service. We were looking into new technologies for our compute tier, and AWS Lambda aka Serverless was hot stuff back then. We decided to give it a try and built our entire stack on it.
Our app was designed to perform event processing at scale. We had over 50 different event sources all feeding data into this beast. Its job was to aggregate the data and format in a common format for downstream consumers.
Prior to launch, we checked all the pre-prod boxes. Alarms? Set. Logs? Ready to go. Rollback Alarm? Armed and ready.
I hit the deploy button and within minutes, I watched my application grinded to a halt. We were receiving the dreaded Throttling exception from AWS Lambda when processing our events. How could this be, I thought? Wasn’t Lambda designed to be, um, scalable?
It turns out, Lambda is certainly capable of handling the throughput we needed. But what I didn’t know at the time was that Lambda has PER ACCOUNT limits on the number of concurrent executions. This value is set to a default value of 1000 for each account + region combination.
In other words, if there was ever a point where my app needed to process over 1000 events at the same time, the 1001th, and every other execution would fail with the Throttling exception. With over 50 event sources for my application, this was obviously a pretty big problem.
It was around this time I discovered there was such a thing as per account service limit quotas on AWS. These limits are described deep in the depths of AWS documentation, hidden away only for the most dedicated to stumble upon.
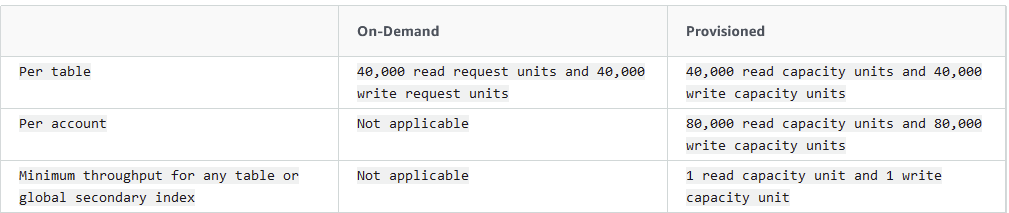
The interesting thing is, there are many limits for many different AWS services. For example, did you know with DynamoDB you have a max of 80k RCUs/WCUs per account? Luckily I haven’t run up to this limit before, but if I had an application that needed that much throughput and found out about this limit in production, I would be pissed.
The good news is that its super easy to create new AWS accounts for each of your application + stage combinations using AWS Organizations. The feature allows you to create, organize, and manage these accounts from a centralized Root account.
You can organize them into Organizational Units, and analyze usage costs at any level of the hierarchy.
In the remainder of this blog post, I’m going to walk you through how to create and manage multiple AWS accounts in the AWS console.
Step 1 – Create an Organization
The first thing to do is to head over to the AWS Organizations part of the AWS console. This can be found by typing “Organizations” into the top search bar of the console.
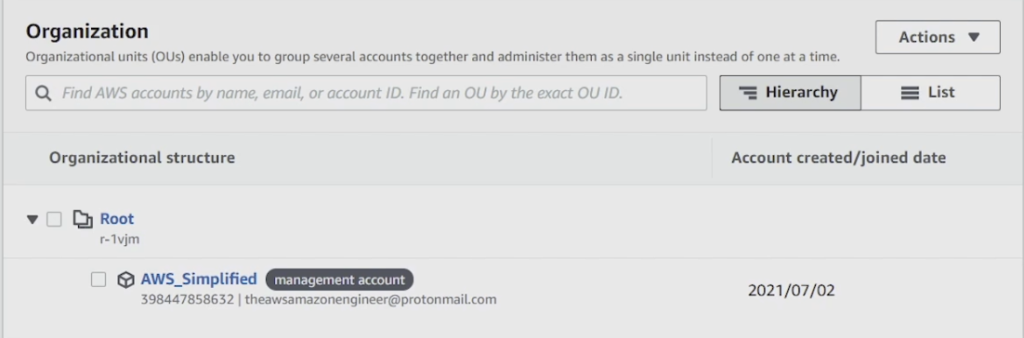
Upon landing on the home page, you should notice an orange Create Organization button in the top right (see below). Click that button seen below to automatically create your organization for this account.

After a brief moment, you should see a screen similar to what I have below.
Step 2 – Creating a New Account
Our next step is to create a new account for our organization. Keep in mind here that there’s also a possibility to add an existing account into your organization via invitation. Doing so renders the invited account in complete control of the administrator of the organization so make sure you’re actually want this before doing it.
To proceed with creating a fresh account in the organization, go ahead and click on the Add an AWS Account button seen below to launch the creation wizard.

The wizard asks you for some basic information including your desired account name, the email address of the account owner, and the IAM role that the account will utilize. This IAM role can be created in advance with restricted permissions, or created as part of the wizard. If you want to restrict this underlying account’s permissions, its best to create one in advance and type it in here. If you don’t know how to create a IAM User / Role with permissions I have a great video on the topic here.
Pro Tip – Mapping Multiple Accounts to the Same Email
I wanted to pause to give you a pro tip here. Its not uncommon to want to map multiple AWS accounts to the same email. By default, you can only have one email mapped to one AWS account. This is pretty annoying especially if you’re a power user looking to maintain ownership over multiple underlying accounts.
To circumvent this, you can append your email with “+integer” to create multiple accounts that map for the same email. For example, if I want to map a new account to my email, daniel@beabetterdev.com, I could enter the email as daniel+1@beabetterdev.com , and the next one as daniel+2@beabetterdev.com and so on.
You’ll still receive all emails to the original email (without the + and integer). Its a neat trick that saves a lot of time spent on creating and managing dozens of emails.
Step 3 – Assign Login Credentials to Your New Account
This was a super confusing step for me. After creating the account I spent an hour or so fumbling around trying to figure out how to log in to the darn thing. It definitely wasn’t clear based on the documentation and I eventually found an answer on the second page of google (the horror!).
After you create your second account, you’ll see some details about your account (below) on the AWS organizations page.
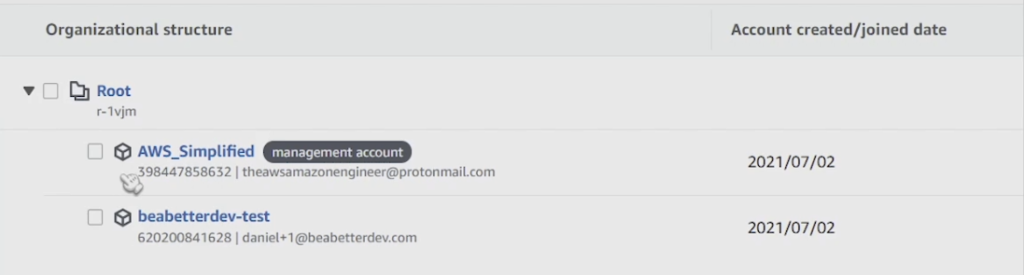
Note the account number 620200841628. This is going to be important when we try to login.
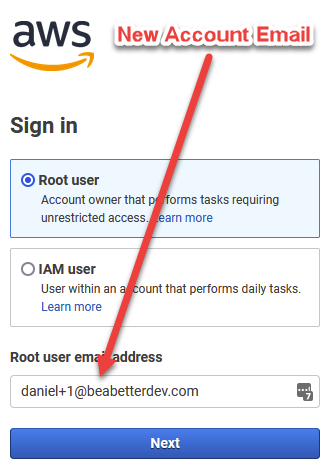
In order to gain access to the account, we need to sign out of our AWS account (or do this in a new different browser) and then go to the AWs console sign in page at https://console.aws.amazon.com/
Make sure you’ve selected the radio box for Root User and NOT IAM user. In the text box below, enter the email you just specified for the new account and click next. It should look like below:
On the next page, click on the blue text that says Forgot Password. You’ll be prompted with a captcha. Fill it out and proceed.
You’ll then be sent an email asking you to reset your password. Follow the prompts and you should be able to set your password, and log in to your brand new account. You should be good to go at this point with a completely fresh account you can hand off to your team or dedicate to a new application.
If you enjoyed this article, be sure to check out my YouTube channel where I teach about AWS and Cloud Computing concepts.


+1 for the pro-tip of using same email
thank you, login the new account is also very confusing to me.
Thanks for this hint with additional account mapped to the same email!
This was very helpful, I had the same issues
Glad I could help!