Trying to understand the difference between Amazon S3 Bucket Policy and IAM? Struggling to decide on when to use one over the other? Learn how to decide and more in this article.
What is an Amazon S3 Bucket Policy?
An Amazon S3 Bucket Policy is an authorization tool to restrict or grant access to resources in an S3 bucket. The bucket policy uses the familiar policy statement syntax that most AWS users may already be familiar with. For example, here is what a simple Bucket Policy looks like that grants access simple read and write access to an S3 bucket:
{
    "Version": "2012-10-17",
    "Statement": [
        {
            "Sid": "Demo",
            "Effect": "Allow",
            "Principal": {
                "AWS": [
                    "arn:aws:iam::111122223333:root",
                    "arn:aws:iam::444455556666:root"
                ]
            },
            "Action": [
                "s3:PutObject",
                "s3:GetObject"
            ],
            "Resource": "arn:aws:s3:::DOC-EXAMPLE-BUCKET/*"

        }
    ]
}
Examples of S3 Bucket Policy Use Cases
Notice that the policy statement looks quite similar to what a user would apply to an IAM User or Role. This is the neat part about S3 Bucket Policies, they allow the user to use the same policy statement format, but apply for permissions on the bucket instead of on the user/role.
Users also have the ability to take advantage of the wide variety of policy statement features using conditions. Examples of what’s possible include:
- Granting access tp specific accounts/users/roles
- Granting permissions to any user (aka public access)
- Limiting access to certain specific IP addresses or IP address ranges
- Restricting access to users who are using Multi Factor Authentication (MFA)
There are many more examples you can learn more about in AWS’ documentation here.
If you’re trying to generate your own policy, there’s a useful tool to help you craft the policy to your liking with the right format. You can try it out here.
Finally, for a great primer on what is possible with IAM Policy statements, review AWS’ documentation here.
Important S3 Bucket Policy Features
There are a handful of other useful S3 Bucket Policy features that may help users decide to leverage it over IAM. Specifically, S3 Bucket Policies allow for policy statements up to 20KB in size. In contrast, IAM based policy statements are limited to 5KB in size – four times less.
The size limit may be a useful consideration for those that typically have extremely large policy statements. Since Bucket Policies were designed to gate access at the resource level, the increased size of the policy statements allows you to add many more controls to it.
You may also enjoy…
AWS S3 Core Concepts – The Things You Need To Know
S3 Standard vs Intelligent Tiering – What’s the difference
Amazon S3 Select vs Athena – Whats the Difference?
Another attractive feature of using S3 Bucket Policies is that it is much easier to setup for cross-account access to your S3 Bucket. For example, users can simply add certain principals which contain the account id of who should be granted access. Conversely, doing this via IAM would require the bucket owner to create a IAM role, a trust policy between the accounts, and provide the user in the guest account the ability to assume that role.
In fact, easy cross-account management is the best reason to use bucket policies over IAM. The reason is simplicity – it takes far less steps to manage a bucket’s access policy than the complicated process of setting up cross account access.
There are few differences between S3 Bucket Policies and IAM based access. However, these two methods have two different paradigms. S3 Bucket Policies use Resource Based Access Control whereas IAM uses Role/User Based Access Control. Its important to keep this in mind when thinking of these two models.
How About Access Control Lists (ACLs) ?
Access control Lists are another feature that S3 users can leverage to grant permissions to their buckets.
The caveat with ACLs is that they only support a finite set of permissions and nothing more. Generally, ACLs are considered to be a “legacy” feature of AWS and should be avoided. Bucket Policies are the suggested mechanism to replace with ACL authorization.
The only case to use ACLs over Bucket Policies (according to AWS) is when needing to grant permissions to specific AWS services like Amazon Cloudfront. You can learn more about their suggested usage scenarios here.
How to Create a S3 Bucket Policy
Creating an S3 Bucket policy is a straightforward process. To do this through the console, head over to the permissions section of your S3 Bucket as seen below.

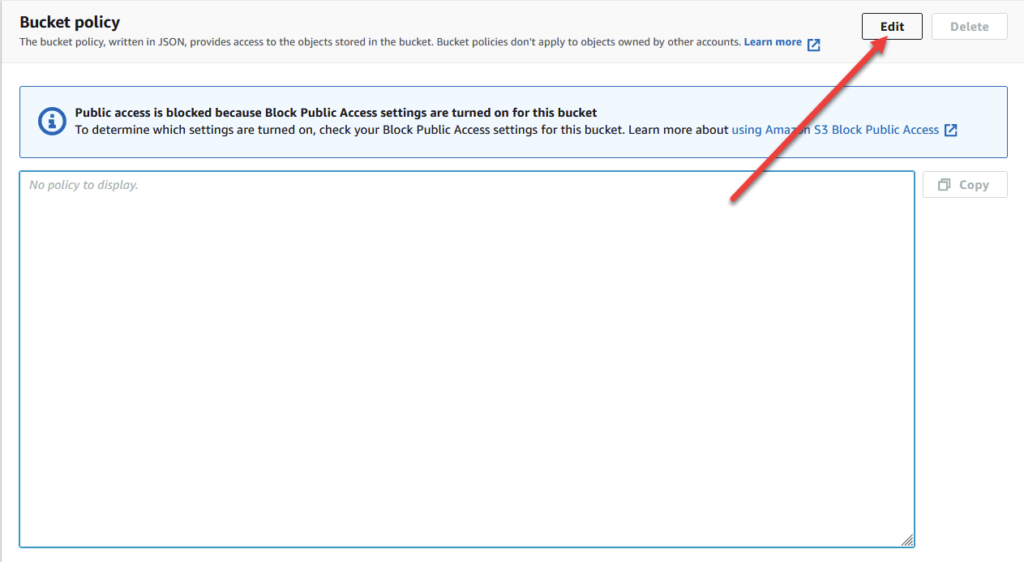
Next, scroll down to the Bucket Policy section. If you do not have a bucket policy already configured, you’ll see a blank input text box. To craft your bucket policy, click on the Edit button as seen below.

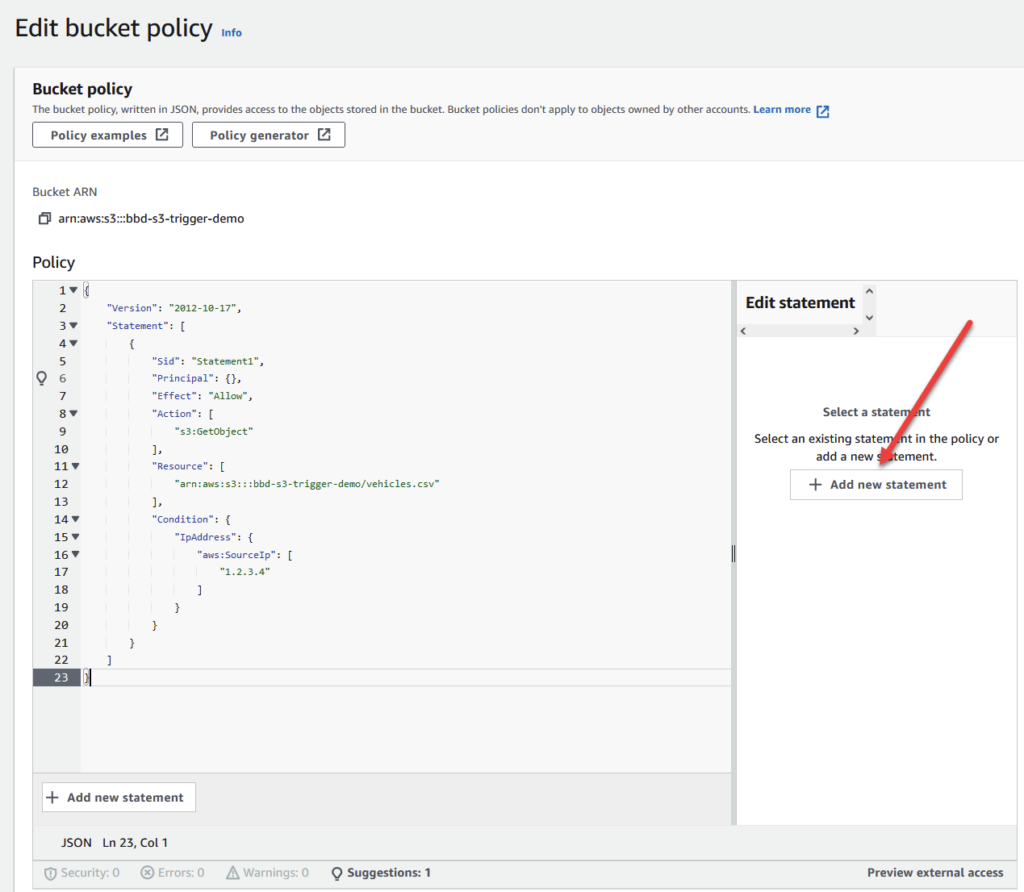
One of the great reasons to use the AWS Console to create your bucket policies is the built in Policy Statement generator. This tool is a wizard that guides you through the creation process, and even informs you of errors as you construct your policy. Highly recommended.
In the example below, you can see how I used the policy statement generator to create a policy statement that gives GetObject permission to my vehicles.csv file in my bbd-s3-trigger-demo bucket only if the requester’s source IP is 1.2.3.4. This is the power of bucket policies – it gives you complete control over who gets access to your bucket’s resources.

When you’re satisfied with your policy, go ahead and click on the orange Save Changes button at the bottom of your page. Your bucket policy should be applied immediately and any new requests to this bucket will be restricted according to the policy.
Creating a Bucket Policy with the AWS CLI
If you prefer to use the AWS CLI to manage permissions, that is possible as well as seen in the example below. Before trying to run this command, make sure the user configured on your CLI has access to S3’s s3:put-object-policy API or the call will fail.
aws s3api put-bucket-policy --bucket MyBucket --policy file://policy.json

policy.json:
{
   "Statement": [
      {
         "Effect": "Allow",
         "Principal": "*",
         "Action": "s3:GetObject",
         "Resource": "arn:aws:s3:::MyBucket/*"
      },
      {
         "Effect": "Deny",
         "Principal": "*",
         "Action": "s3:GetObject",
         "Resource": "arn:aws:s3:::MyBucket/MySecretFolder/*"
      },
      {
         "Effect": "Allow",
         "Principal": {
            "AWS": "arn:aws:iam::123456789012:root"
         },
         "Action": [
            "s3:DeleteObject",
            "s3:PutObject"
         ],
         "Resource": "arn:aws:s3:::MyBucket/*"
      }
   ]
}
Its also important to note that users opting to use the CLI won’t have the help of the UI to create and validate their policy statement. You’ll have to use a tool like the AWS Policy Statement Generator and copy it over to a file before running the CLI command.
What is IAM?
IAM stands for Identity and Access Management. It is an AWS service that allows administrators to create Users and Roles (and a couple of other entities) and grant permissions to them.
Folks familiar with AWS might be very familiar with IAM. It is pretty much the bread and butter of access management on AWS.
Using IAM, administrators craft policy statements that define permission sets. These policy statements are then applied to the User/Role so that they can perform the correct action.
For example, I can create a IAM User that has s3:GetObject permissions. This will allow the user to use the GetObject API against any object/bucket permission in the account.
IAM is a super flexible service, but it focuses on the user/role as the primary entity. In other words, IAM is similar to a traditional Role Based Access Control. In contrast, S3 Bucket Policies are Resource Based Access Control.
Now we know the difference between S3 Bucket Policies and IAM to manage access to our bucket. But when should we use one over the other? It turns out its a very simple decision to be made and is summarized below.
When To Use S3 Bucket Policies vs IAM
Consider using a Bucket Policy if…
- You prefer to manage all of your permissions in S3
- You want a simple way to grant permissions to other AWS accounts
Consider using an IAM User Policy if…
- You prefer to manage permissions through IAM users or roles
- You prefer the flexibility IAM provides such as Groups to manage permissions
All in all the choice to use S3 Bucket Policies over IAM is predominantly due to preference. If you have a certain S3 bucket that is going to be used throughout an organization or group of teams, it makes more sense to control permission on the bucket level. Either way, the choice isn’t a one way door and you can easily revert to using one over the other if you change your mind later.


